Friday, November 5, 2010
Research Tutorial
The purpose of this tutorial is to explain and help familarize a new user to flowgraphs, to create basic actions that an AI character is able to perform using a key press.
Crysis Files
http://www.filefront.com/17479534/3292443_crysisfiles.rar
Latest version used : 3292443_exp02console.cry
C/O = makes certain characters perform an action.
Latest version used : 3292443_exp02console.cry
C/O = makes certain characters perform an action.
Monday, October 11, 2010
Porosity Lens Brief
The concept behind my Porosity lens machinima is to demonstrate and observe people's movements through spaces which form an interaction between their surroundings and actions. Using the original train station model I have modified it by removing most of the train tracks platforms and simply mirrored a section of the railings to form a continuous structure. Half the structure railings have been stretched down and attached to a solid platform which will serve as the basis for the people's movement.
This was then mirrored and attached to create an identical structure forming a symmetrical space. The spaces shown highlighted in my sketch installation serve as the multiple different sections that the structure is divided into, using simple panels created in sketchup, the gaps in each section hanging overhead were covered using these panels and would appear using the ProximityTriggerOpacity flowgraph for my AI characters moving through it. The proximity triggers were each individually placed in the spaces of each section so when an AI character was present within that area, the panels would appear overhead.
The proximity triggers were tweaked to only recieve AI presence by ticking 'OnlyAI' to be true and 'OnlyPlayer' property to be false. This was done in order to only allow the AI movements to interact with the space and not be inteferred by the player. The structure itself was given a 4.8 value of glow in order to highlight the panels which had a dark material.
This effectively allows us to observe which sections of the structure are currently inhabitated by an AI character moving around the space. ALl movements and actions of the AI characters have been individually customize so that they continuously move around the structure in a looped pattern at different speeds and different positions.
When observing overhead or simply by viewing which panels appear, one can get a sense of the patterns and amount of time people spend in each space. The final result I believe portrayed this quite clearly, as the viewer is able to see the AI characters move around within the space and when entering different sections of the structure, trigger the opacity panel relative to that section.
Since this was quite clear and an easy to understand concept, I purposely did not add in text explaining my hypothesis because this would only distract the viewer from observing the actual interactions and movements shown in the video. Furthermore, with the added glow to the structure and dark panels I used a time lapse to display the movements of people and what interactions they had with the building as time passed by. Along with an overhead view of the structure, I believe this was an effective way to present how people move through space and how they interact.
Sketch Installation

 The purpose of my sketch installation is to use the 3 rows highlighted, each square section inbetween the railings as a interactive space for people moving through. Each space will feature a panel hanging overhead in each section which will alter in appearance when AI characters are within that space. When looking overhead, one will get a sense of when there are people present within a space and can observe the patterns in which those people move in and out of those spaces.
File link: http://www.filefront.com/17479587/3292443_sketchinstallation.skp
Flowgraph Node Mastery
Flowgraph Node 1 - AIFollowSpeedStance
With some help from our tutor Jules, I was able to create a simple AI movement flowgraph for AI characters in Crysis by setting AI path points then linking them to the AI and a AISpeedStance node. Further research into the node allowed me to figure out what different numbers and stances used in the dialogue caused the AI character to perform.
Using the list of numbers found in the dialogue, I found they did the following:
0=Slow Walk
1=Walk
2=Jog
3=Sprint
Stances:
CombatAlerted
Combat
Relaxed
Prone
Stealth
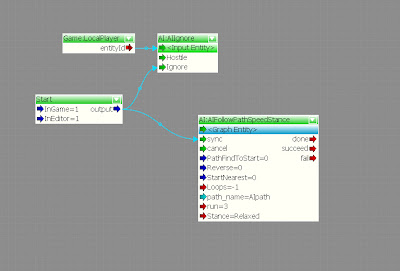
I added in an AIIgnore node to the flowgraph and linked it to LocalPlayer so it was possible to use on characters that were naturally hostile to the player. Once I had mastered this node, I was able to create a multitude of characters in my level moving and reacting in different ways.
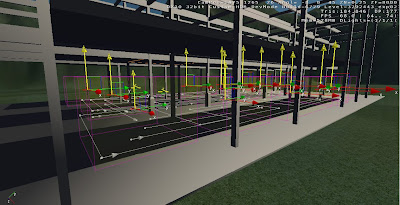
 Using multiple AI paths, I have laid them out all throughout my structure in loops for each AI character present within the structure. All paths have been strategically laid out so that every section of the structure is passed through by the AI characters, triggering the panels overhead to appear. Each moving speed and stance of AI characters have been individually modified so that each characters movements are unique and all walk/run at different speeds.
Flowgraph Node 2 - ProximityTriggerOpacityChange
Further research into flowgraph nodes that affect the opacity of certain objects, I was able to use features taken from Jule's flowgraph on changing opacity of an object shown on http://benv2423-2010jc.blogspot.com/ along with the help of nodes taken from changing material glow using the ProximityTriggerChangeGlow flowgraph also shown on Jule's blog and alter it using changing values within opacity instead of glow.
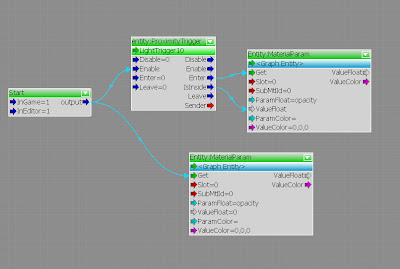 With the use of proximity triggers, I was able to setup sections of my sketch installation in which the AI characters would enter and trigger the opacity of overhead panels. Using values ranging from 0-20 in the panel's opacity, I was able to link the panels to the flowgraph and proximity trigger causing them to appear whenever an AI character was present within the proximity triggers place below their section.
 By using the values found within the proximity trigger properties, I have the options 'OnlyAI' ticked true while 'OnlyPlayer' ticked false. This made it so that only AI controlled characters present within the trigger area would cause the panels to appear in that section. As long as an AI character is present within that section, the panel would be visible.
Flowgraph Node 3 - AIExecute
I initially created an AIExecute flowgraph taken from http://wiki.crymod.com/index.php/Entity_Always_Facing_Player and tweaked it so, when attached to an AI character they would follow me like a squad mate. Then with the help of Jules, I was able to create my own flowgraph using the same properties but instead, added a AIExecute node which allowed me to customize the certain actions the AI characters would perform with a key press.
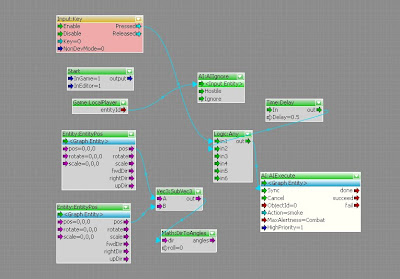 Adding an AIIgnore function linked to LocalPlayer entity was used for the flowgraph because it allowed me to attach the script to different models such as hostiles instead of friendlies to prevent them from attacking my player. Using the actions field within the AI:Execute node, this allowed me to customize many different actions for the AI character using a key press.
Video demonstration shows multiple actions being performed by AI using multiple sets of the same flowgraph nodes taken from my AI:Execute script. With the different sets, only key input and action within the ActionExecute node were modified which allowed different key presses to perform different actions.
In this case the keys listed did the following:
O = Yawn
L = Sitdown & Rest
K = Smoke
With some help from our tutor Jules, I was able to create a simple AI movement flowgraph for AI characters in Crysis by setting AI path points then linking them to the AI and a AISpeedStance node. Further research into the node allowed me to figure out what different numbers and stances used in the dialogue caused the AI character to perform.
Using the list of numbers found in the dialogue, I found they did the following:
0=Slow Walk
1=Walk
2=Jog
3=Sprint
Stances:
CombatAlerted
Combat
Relaxed
Prone
Stealth

I added in an AIIgnore node to the flowgraph and linked it to LocalPlayer so it was possible to use on characters that were naturally hostile to the player. Once I had mastered this node, I was able to create a multitude of characters in my level moving and reacting in different ways.
 Using multiple AI paths, I have laid them out all throughout my structure in loops for each AI character present within the structure. All paths have been strategically laid out so that every section of the structure is passed through by the AI characters, triggering the panels overhead to appear. Each moving speed and stance of AI characters have been individually modified so that each characters movements are unique and all walk/run at different speeds.
Flowgraph Node 2 - ProximityTriggerOpacityChange
Further research into flowgraph nodes that affect the opacity of certain objects, I was able to use features taken from Jule's flowgraph on changing opacity of an object shown on http://benv2423-2010jc.blogspot.com/ along with the help of nodes taken from changing material glow using the ProximityTriggerChangeGlow flowgraph also shown on Jule's blog and alter it using changing values within opacity instead of glow.
 With the use of proximity triggers, I was able to setup sections of my sketch installation in which the AI characters would enter and trigger the opacity of overhead panels. Using values ranging from 0-20 in the panel's opacity, I was able to link the panels to the flowgraph and proximity trigger causing them to appear whenever an AI character was present within the proximity triggers place below their section.
 By using the values found within the proximity trigger properties, I have the options 'OnlyAI' ticked true while 'OnlyPlayer' ticked false. This made it so that only AI controlled characters present within the trigger area would cause the panels to appear in that section. As long as an AI character is present within that section, the panel would be visible.
Flowgraph Node 3 - AIExecute
I initially created an AIExecute flowgraph taken from http://wiki.crymod.com/index.php/Entity_Always_Facing_Player and tweaked it so, when attached to an AI character they would follow me like a squad mate. Then with the help of Jules, I was able to create my own flowgraph using the same properties but instead, added a AIExecute node which allowed me to customize the certain actions the AI characters would perform with a key press.
 Adding an AIIgnore function linked to LocalPlayer entity was used for the flowgraph because it allowed me to attach the script to different models such as hostiles instead of friendlies to prevent them from attacking my player. Using the actions field within the AI:Execute node, this allowed me to customize many different actions for the AI character using a key press.
Video demonstration shows multiple actions being performed by AI using multiple sets of the same flowgraph nodes taken from my AI:Execute script. With the different sets, only key input and action within the ActionExecute node were modified which allowed different key presses to perform different actions.
In this case the keys listed did the following:
O = Yawn
L = Sitdown & Rest
K = Smoke
Flowgraph Research
Researching a simple action impulse node, I have managed to master the flowgraph successfully by mapping my own keys and further movements. In the experiment, I attached a flowgraph taken from http://wiki.crymod.com/index.php/Action_Impulse_Demonstration
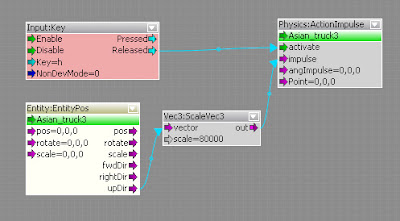 This was attached to the model 'asian_truck' in sandbox 2. This added the function of making the truck move upwards in the world using a vector3 script whenever the 'h' key was pressed in game. I was able to further expand this using my own understanding of the flowgraph and mapped out my own directions for the truck to move in, adding in multiple nodes with the same properties, I altered the direction of the output for which the truck would be moved.
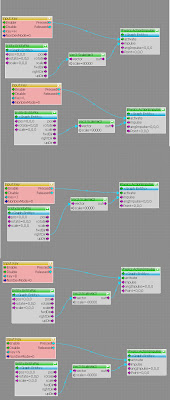 In addition to having the truck move upwards using the key input 'H', here is a list of key inputs I have added to the flowgraph:
H = UP
B = LEFT
L = FORWARD
J = RIGHT
N = DOWN
Since there only fwdDir, rightDir and upDir values found in the entityPOS node determining the direction of the entity, I used negative values within the vector3 scaling to make the truck move in the opposite direction of the list already given to me movements such as left, backwards etc. are possible.
Subscribe to:
Posts (Atom)